Go项目中的BDD实践

文章目录
背景
研发同学完成功能开发后,一般通过单元测试或手动测试,来验证自己写的功能是否正确运行。 但是这些测试很多是从开发角度出发,存在样例单一、测试覆盖率不全、非研发同学无法较全面了解产品的行为表现等情况。
近几年 BDD 作为一种流行的测试方式和产品验收手段,能较好地解决以下两个问题:
- 减少开发和产品的沟通成本,增加协作。比如产品经理通过 feature文件的方式,更具体地给开发者说明想要预期效果。
- 综合测试。 BDD 能够把上线之后手工测试这一过程自动化。
基于上面两点,本文介绍了团队在 Go 项目开发过程中接入 BDD 的一个实践,以及一些感悟体会。
BDD流程
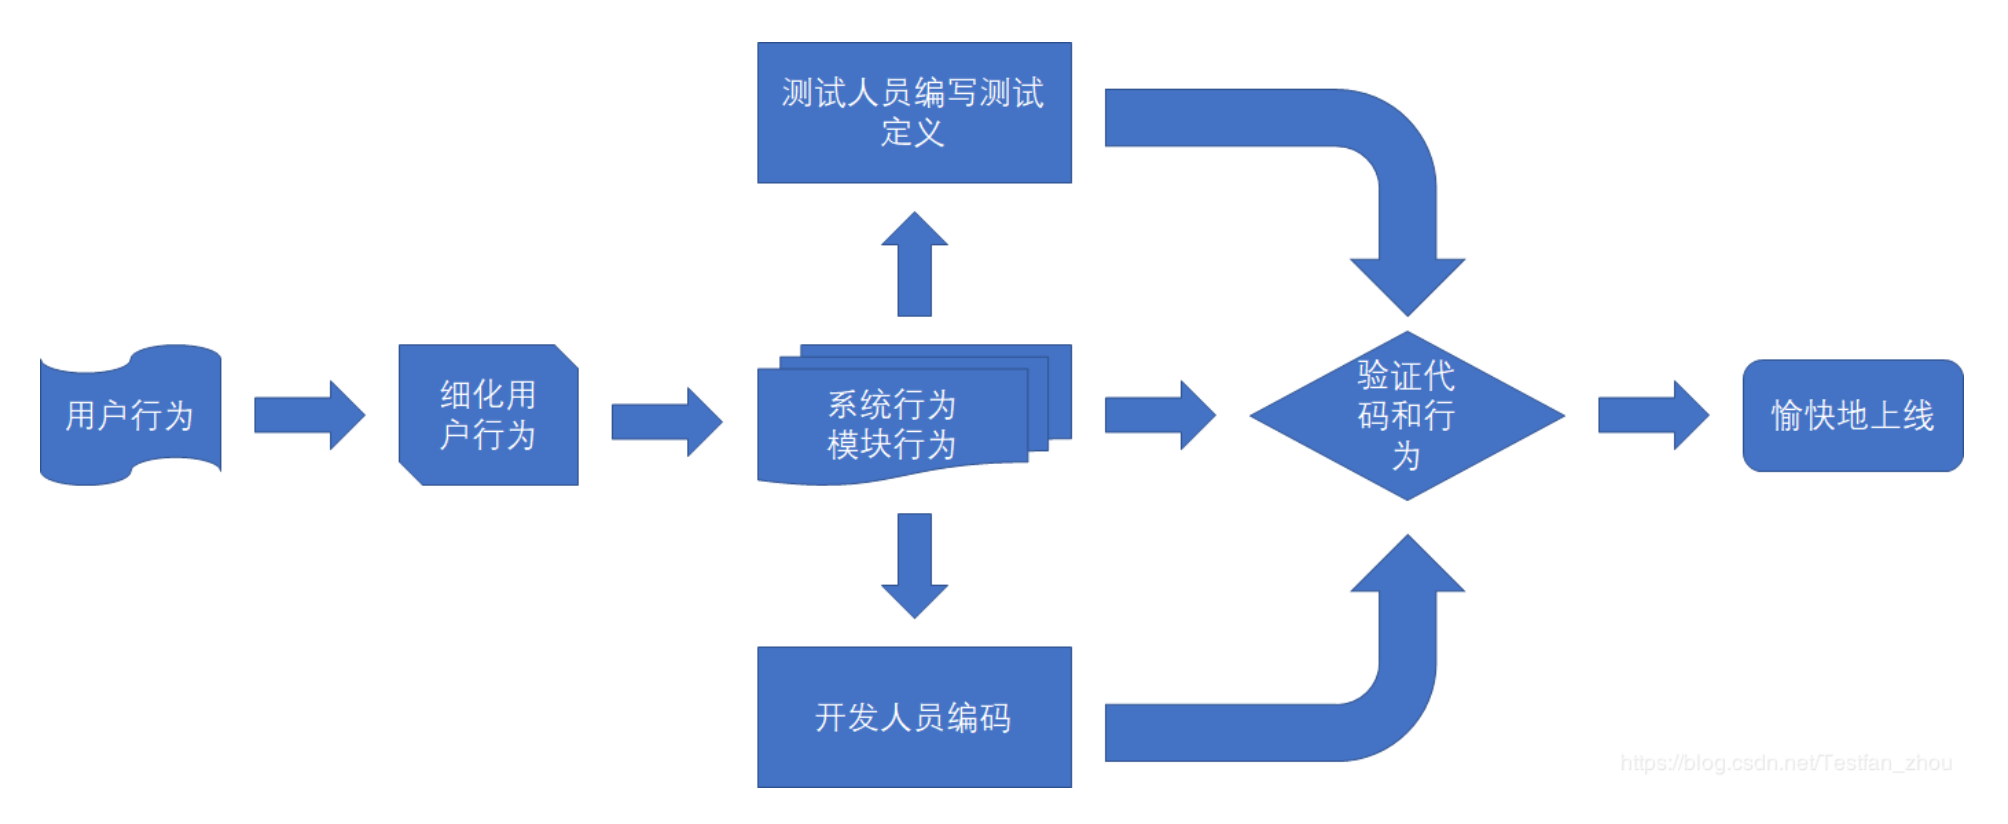
BDD 会在 PRD Review 时开始介入,产品经理在给出产品需求文档的同时,会提供具体的业务场景(features),完成开发后,BDD 测试会作为验收工作的一部分,测试流程如下:
PO 预先提供 BDD 测试样例的 feature 文件。
后端完成功能开发后,编写 feature 样例对应的测试代码。
完成 BDD 测试编码,本地测试通过后提交代码,发起 Pull Request。
CI 自动触发 BDD 测试,在测试通过后,才可以 Merge Pull Request。
测试框架
BDD 风格的 Go 测试框架主流有3个:
这些框架都有自己的一些特性:
- Ginkgo 和 GoConvey 支持 BDD 风格的解析语法、展示测试的覆盖率的功能。
- GoConvey 有 Web UI 界面,用户体验好。
- GoDog 的定位是支持行为驱动框架 Cucumber。
我们的对框架选择有两点考虑:
- 支持 Gherkin 语法,不需要太高的学习成本,产品和研发能协作。
- 直接集成到
go test。
因为 GoDog 支持 Gherkin 语法,容易上手, 我们最后选择了 GoDog。
BDD实践
以之前开发的项目为例, setting.feature 文件如下:
| |
这是一个具体的后端业务场景:通过 POST 方法发起新建setting请求。HTTP Code返回201,返回的 Response 与给出的样例 JSON 匹配,满足以上两点,BDD 才会测试通过。
下面是通过 GoDog 来完成这个场景的测试:
安装 godog:
go get github.com/cucumber/godog/cmd/godog@v0.8.1godog 可生成feature文件对应的测试代码模板。终端执行
godog features/email.feature,生成模板代码:1 2 3 4 5 6 7 8 9 10 11 12 13 14 15 16 17 18 19// You can implement step definitions for undefined steps with these snippets: func iSendRequestToWithRequestBody(arg1, arg2 string, arg3 *messages.PickleStepArgument_PickleDocString) error { return godog.ErrPending } func iExpectThatTheResponseCodeShouldBe(arg1 int) error { return godog.ErrPending } func theResponseShouldMatchJson(arg1 *messages.PickleStepArgument_PickleDocString) error { return godog.ErrPending } func FeatureContext(s *godog.Suite) { s.Step(`^I send "([^"]*)" request to "([^"]*)" with request body:$`, iSendRequestToWithRequestBody) s.Step(`^I expect that the response code should be (\d+)$`, iExpectThatTheResponseCodeShouldBe) s.Step(`^the response should match json:$`, theResponseShouldMatchJson) }将代码拷贝到 setting_test.go,开始补充每一步要执行的动作。
godog 定义 Suite 结构体,通过注册函数来执行每个 Gherkin 文本表达式。FeatureContext 相当于测试的入口,可以做一些前置和后置 hook。Suite 会以正则表达式匹配的方式,执行每个匹配到的动作。
1 2 3 4 5 6 7 8 9 10 11 12 13 14func FeatureContext(s *godog.Suite) { api := &apiFeature{} s.BeforeSuite(InitBDDEnv) s.BeforeScenario(api.resetResponse) s.Step(`^I send "([^"]*)" request to "([^"]*)"$`, api.iSendRequestTo) s.Step(`^I expect that the response code should be (\d+)$`, api.iExpectThatTheResponseCodeShouldBe) s.Step(`^I send "([^"]*)" request to "([^"]*)" with request body:$`, api.iSendRequestToWithRequestBody) s.Step(`^the response should match json:$`, api.theResponseShouldMatchJson) s.AfterSuite(appctx.CloseMockSpannerAndClients) }BeforSuite 是前置 hook,用于一些服务配置。在这个项目里,我们调用 InitBDDEnv 函数, 初始化 application:加载配置、初始化各个组件和生成 ApiRouter:
1 2 3 4 5 6 7 8 9 10 11 12 13 14 15 16 17 18 19 20func InitBDDEnv() { // Load test config config, err := conf.LoadConfig() if err != nil { return } appctx.InitMockApplication(config) // Create Table and import data in fake db PrepareMockData() // Start a mock API Server server = apiserver.NewApiServer(apiserver.ServerConfig{ Port: 8080, // can modify BasePath: "/businesses/v1", }) server.AddApiGroup(BuildApiGroup(context.Background(), config)) }发起 API 请求:
1 2 3 4 5 6 7 8 9 10 11 12 13 14 15 16 17 18 19 20 21 22 23 24func (a *apiFeature) iSendRequestToWithRequestBody(method, url string, body *messages.PickleStepArgument_PickleDocString) error { var payload []byte var data interface{} // Unmarshal body.Content and get correct payload if err := json.Unmarshal([]byte(body.Content), &data); err != nil { return err } var err error if payload, err = json.Marshal(data); err != nil { return err } req, err := http.NewRequest(method, url, bytes.NewReader(payload)) if err != nil { return err } // filling result to httpRecorder server.GinEngine().ServeHTTP(a.resp, req) return nil }对请求响应的校验:
1
2
3
4
5
6
func (a *apiFeature) iExpectThatTheResponseCodeShouldBe(code int) error { if code != a.resp.Code { return fmt.Errorf("expected response code to be: %d, but actual is: %d", code, a.resp.Code) } return nil }完成测试文件的编写后, 执行
godog features/setting.feature就可以跑 BDD 了。
总结
目前业界主流的开发模式有 TDD、BDD 和 DDD, 实际的项目中,因为面对各种不同需求和其他因素,决定了我们所采用的开发模式。本文介绍了 BDD 开发模式的实践,是我们团队在 Go 项目接入 BDD 的第一次探索,实际应用效果良好,有效解决了开发和产品之间沟通和协作的痛点问题;以及作为 TDD 的一种补充,我们试图转换一种观念,通过业务行为,约束它应该如何运行,然后抽象出能达成共识的规范,来保证根据设计所编写的测试,就是用户期望的功能。